Just wanted to give you a heads up that if you or friends/family are looking to buy a new computer you may want to steer clear of Lenovo. They are installing a trusted certificate so they can see (MiTM) all your traffic so they can target you with ads better. But they are doing this for every site you visit, including your bank so who knows what information they can see.
VMware vCenter Server Appliance 5.5.0 Has An Insecure NTP Server
On January 10, 2014 a vulnerability in ntpd, the Network Time Protocol daemon, was made public (US CERT VU#348126):
UDP protocols such as NTP can be abused to amplify denial-of-service attack traffic. Servers running the network time protocol (NTP) based on implementations of ntpd prior to version 4.2.7p26 that use the default unrestricted query configuration are susceptible to a reflected denial-of-service (DRDoS) attack. Other proprietary NTP implementations may also be affected.
I have encountered several vCenter Server Appliances, version 5.5.0 build 1476327 and older, that were exposed to the general Internet, and have been found to have this vulnerability. In these cases they were participating in DDoS attacks.
Yesterday I looked to the VMware KB to see if there were any security updates for these vCSAs, or mitigation approaches. Despite the vulnerability being over a month old there is no mention of it from VMware, nor is there a fix of any sort. The vulnerability probably extends to older versions of VMware ESX, too, if you are using NTP on them (as per best practices).
If you are running a vCenter Server Appliance I strongly suggest that you open a case with VMware Support regarding this problem. They have internal KB information about mitigating this. Ask them to search for CVE-2013-5211.
If you want to mitigate this problem on your own there are two ways to do it. First, VMware actually has public KB information in 1006427. It’s just buried (search that KB for CVE-2013-5211). Follow my steps below to edit the file and add their information.
If you want to mitigate the problem in a completely unsupported manner, but the one recommended by SANS and other organizations, you can SSH into the vCSA as root, and add “disable monitor” to /etc/ntp.conf. You can do this with the following steps:
- vi /etc/ntp.conf
- Move the cursor using the arrow keys to just below the entry called “driftfile /var/lib/ntp/drift/ntp.drift”
- Type an ‘i’ to put vi into insert mode. Don’t type the single quotes I use here, just the letter i.
- Type “disable monitor” and hit Enter.
- Type ‘ESC’ to get vi out of insert mode.
- Type ‘:wq’ to get vi to write the file and quit.
- service ntp restart
SPECIAL THANKS for this article: http://lonesysadmin.net/2014/02/13/vmware-vcenter-server-appliance-5-5-0-insecure-ntp-server/
Failed to connect to VMware Lookup Service, SSL certificate verification failed
I ran in to this error today that which says “Failed to connect to VMware Lookup Service”. Or to be more precise:
Failed to connect to VMware Lookup Service.
SSL certificate verification failed.
I had been playing around in my lab and I am guessing this error was caused by the fact that I changed the hostname of my vCenter Server Appliance after configuring it. When I rebooted the VCVA I bumped in to this issue. Luckily it is very easy to solve:
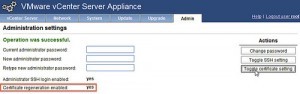
- Go to http://<vcenter ip address or fqdn>:5480
- Click “Admin” Tab
- Click “Toggle certificate setting” under “Actions”
- Restart the vCenter Server Appliance
- During the restart the certificates will be regenerated
- Click “Admin” Tab and disable the “Toggle certificate setting”
Special thanks to Yellow Bricks for this blog!
Creating and importing self-signed SSL certificates for vCD using keytool
To create and import self-signed SSL certificates:
- Create an untrusted certificate for the HTTP service host with the command:keytool -keystore certificates.ks -storetype JCEKS -storepass passwd -genkey -alias http
- Enter the fully qualified domain name of the HTTP service host when prompted for your first name and last name.
- Create an untrusted certificate for the console proxy service host with the command:keytool -keystore certificates.ks -storetype JCEKS -storepass passwd -genkey -alias consoleproxy
- Verify that all the certificates have been imported, list the contents of the keystore file with the command:keytool -storetype JCEKS -storepass passwd -keystore certificates.ks -list
Notes:
- By default, certificates are valid only for 3 months. To increase the duration, add the switch -validity number_of_days when creating your certificate.
- After creating the certificates, you must run the /opt/vmware/vcloud-director/bin/configure script. This script prompts you for the SSL certificates. After you enter the required passwords, the vCloud Director service starts.
Creating and importing signed SSL certificates for vCloud Director using keytool
To create and import signed SSL certificates:
- Create the certificate.
- To create an untrusted certificate for the HTTP service host, run the command:keytool -keystore certificates.ks -storetype JCEKS -storepass passwd –genkey -alias http
- To create a certificate signing request for the HTTP service, run the command:keytool -keystore certificates.ks -storetype JCEKS -storepass passwd –certreq -alias http -file http.csrNote: This command creates a certificate signing request in the file http.csr.
- To create an untrusted certificate for the console proxy service host, run the command:keytool -keystore certificates.ks -storetype JCEKS -storepass passwd -genkey -alias consoleproxy
- To create a certificate signing request for the console proxy service, run the command:keytool -keystore certificates.ks -storetype JCEKS -storepass passwd -certreq –alias consoleproxy -file consoleproxy.csrNote: This command creates a certificate signing request in the file consoleproxy.csr.
- Send the certificate signing requests to your Certification Authority. You receive the SSL Certificates in an email.
- When you receive the signed certificates, import them into the keystore.
- To import the Certification Authority’s root certificate into the keystore file, run the command:keytool -storetype JCEKS -storepass passwd -keystore certificates.ks -import –alias root -file root.cer
- To import the Certification Authority’s intermediate certificates into the keystore file, run the command:keytool -storetype JCEKS -storepass passwd -keystore certificates.ks -import –alias intermediate -file intermediate.cer
- To import the host-specific certificate for the HTTP service, run the command:keytool -storetype JCEKS -storepass passwd -keystore certificates.ks -import –alias http -file http.cer
- To import the host-specific certificate for the console proxy service, run the command:keytool -storetype JCEKS -storepass passwd -keystore certificates.ks -import –alias consoleproxy -file consoleproxy.cer
- Verify that all the certificates have been imported, list the contents of the keystore file with the command:keytool -storetype JCEKS -storepass passwd -keystore certificates.ks -list